This Terraform configuration provisions a secure Linux VM infrastructure on Azure following Microsoft's best practices for single VM deployments.
## Architecture Overview
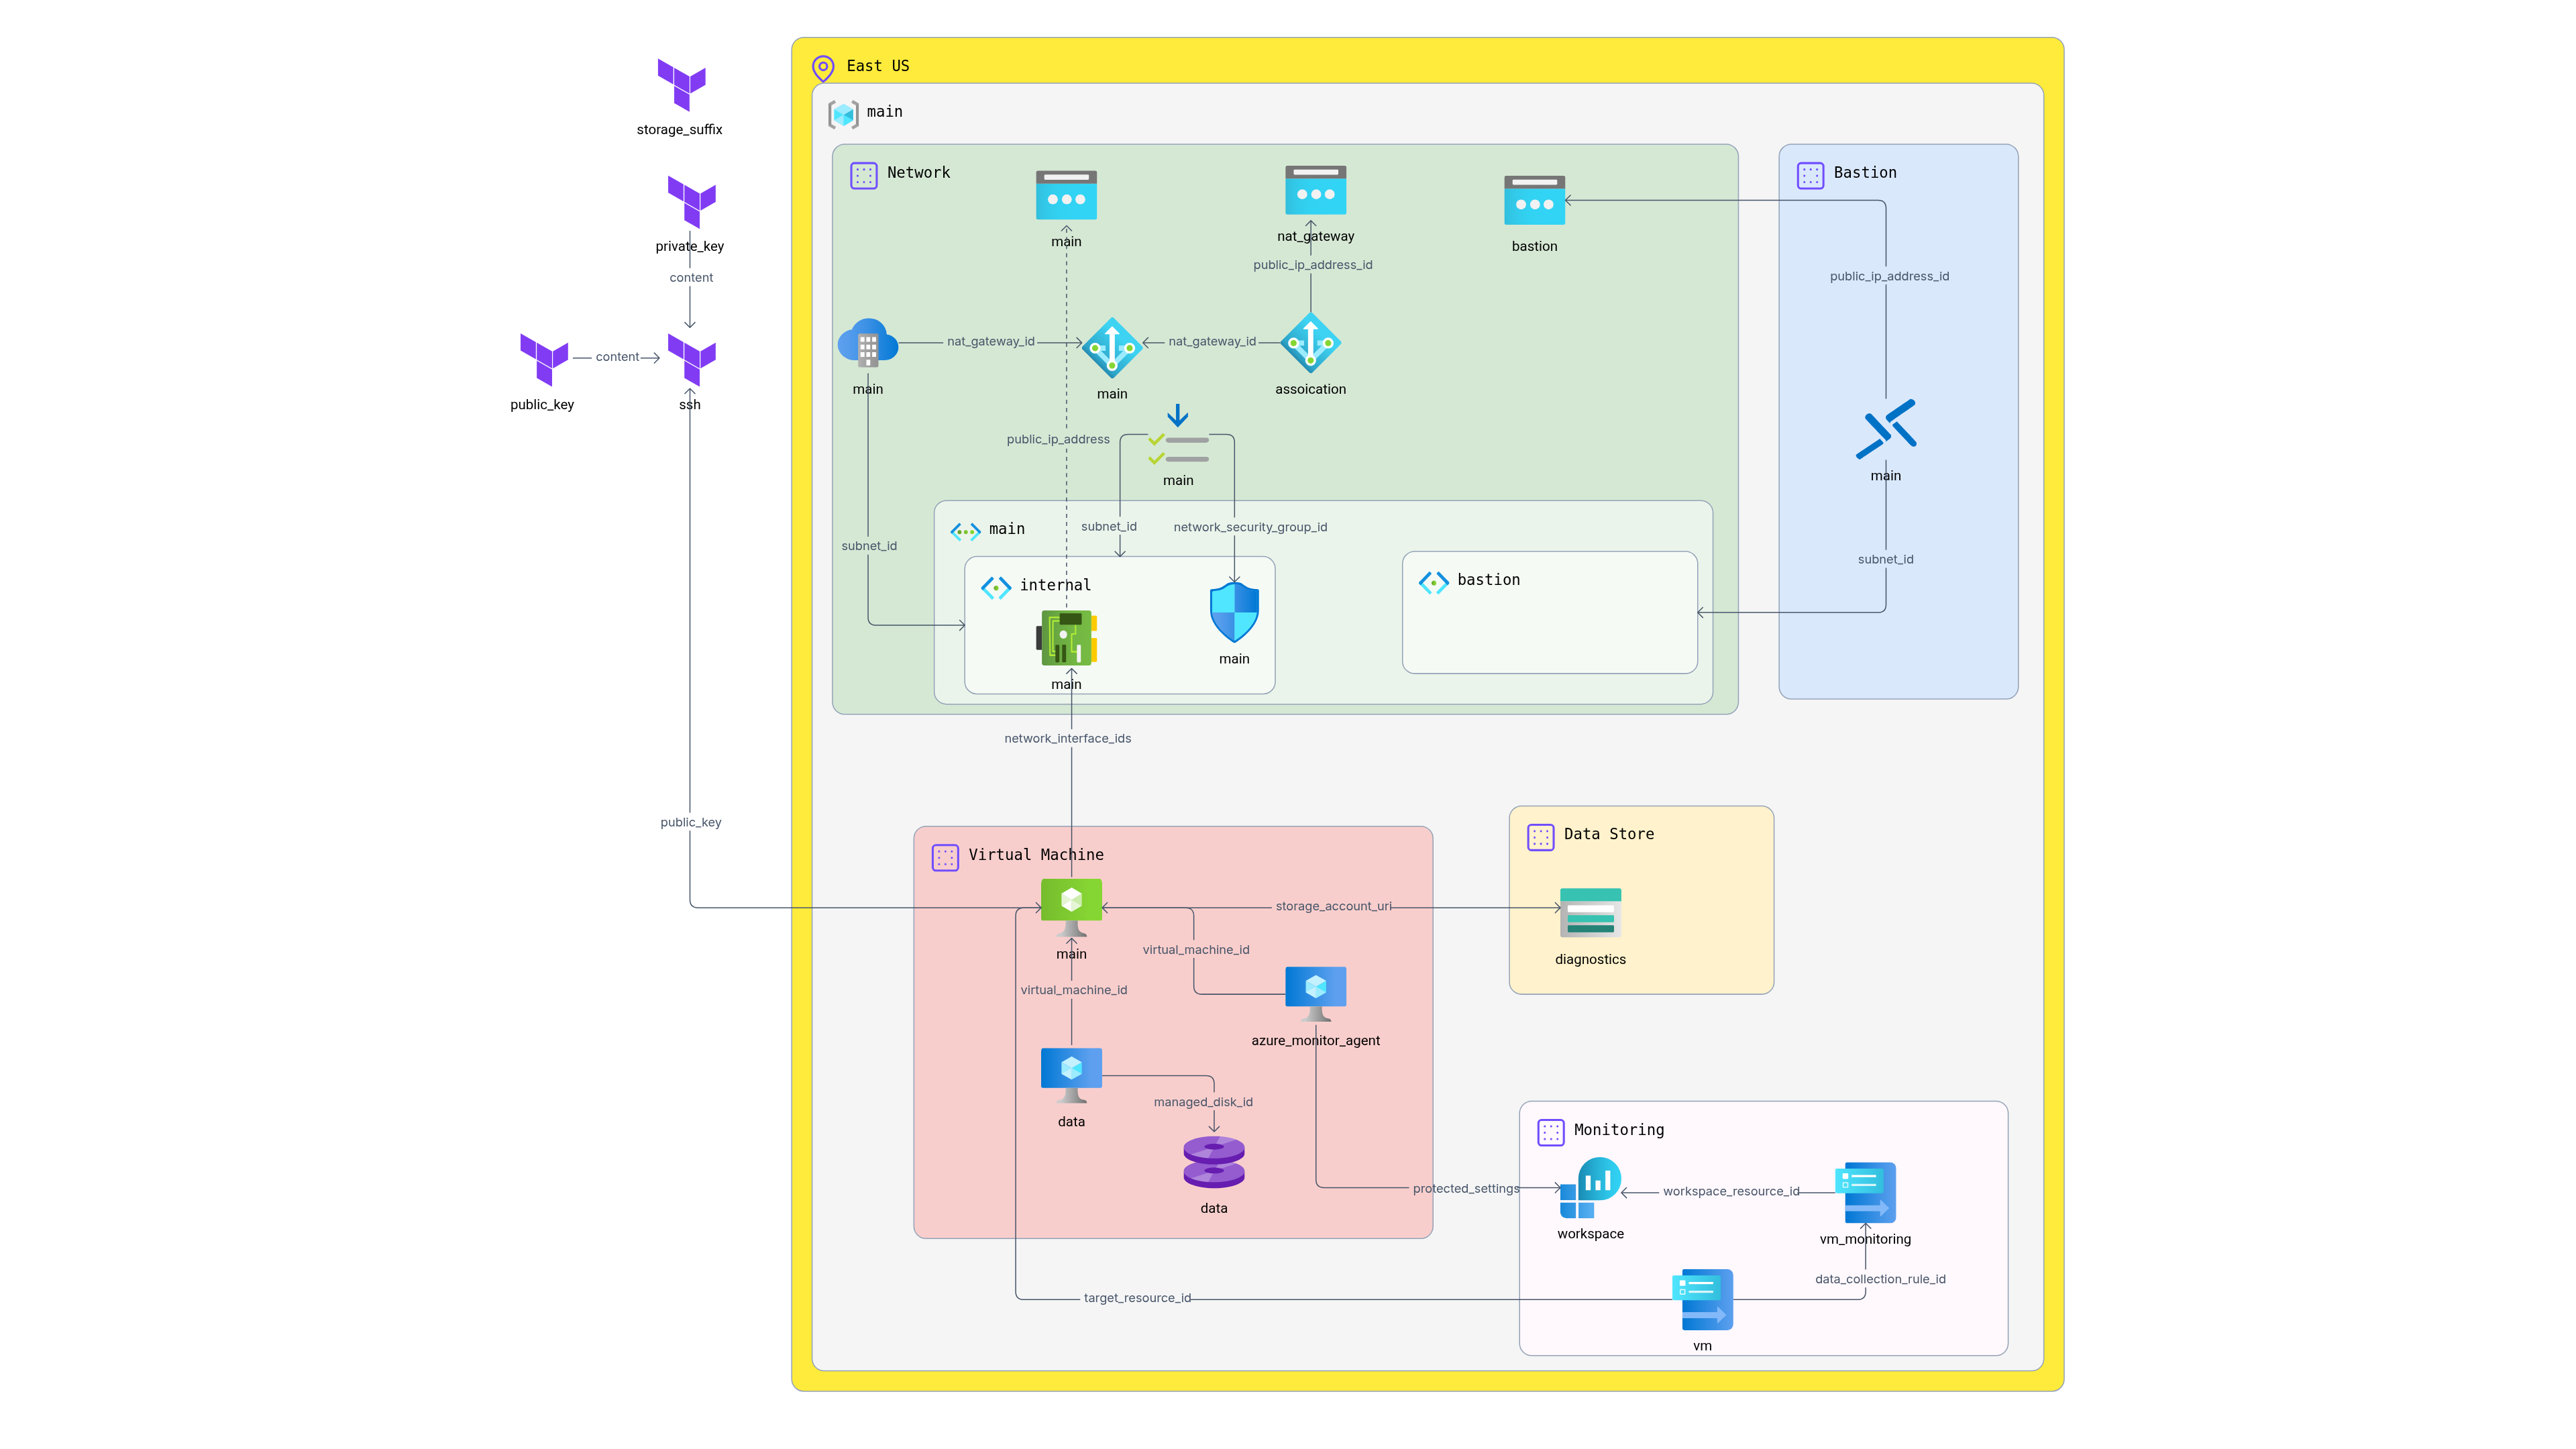
The infrastructure includes:
- **Resource Group**: Logical container for all resources
- **Virtual Network & Subnet**: Network isolation and segmentation
- **Linux Virtual Machine**: Ubuntu 22.04 LTS with configurable sizing
- **Managed Disks**: OS disk and additional data disk for application data
- **Network Security Group**: Firewall rules for controlled access
- **Azure Bastion**: Secure RDP/SSH access without public IP exposure
- **NAT Gateway**: Secure outbound internet connectivity
- **Storage Account**: Diagnostic logs and boot diagnostics
- **Network Interface**: VM network connectivity
## Prerequisites
- **Azure CLI**: Installed and authenticated (`az login`)
- **Terraform**: Version >= 1.2 installed
- **SSH Key Pair**: Either let Terraform generate one automatically OR prepare your own:
```bash
# Only needed if generate_ssh_key = false
ssh-keygen -t rsa -b 4096 -f ~/.ssh/id_rsa
```
## Project Structure
```
├── provider.tf # Terraform and Azure provider configuration
├── locals.tf # Common resource names and configurations
├── variables.tf # Input variable declarations
├── terraform.tfvars # Variable values (customize for your environment)
├── main.tf # Core Azure resource definitions
├── outputs.tf # Output values and connection information
└── README.md # This documentation
```
## Quick Start
### 1. Clone and Initialize
```bash
# Navigate to project directory
cd azure-linux-vm-terraform
# Initialize Terraform
terraform init
```
### 2. Customize Configuration
Edit `terraform.tfvars` to match your requirements:
```hcl
# Update these values
project_name = "myproject"
environment = "dev"
location = "East US"
admin_username = "yourusername"
# SSH Key Options (choose one)
generate_ssh_key = true # Let Terraform generate SSH keys
ssh_key_output_path = "./ssh-keys" # Where to save generated keys
# OR
# generate_ssh_key = false # Use existing SSH key
# ssh_public_key_path = "~/.ssh/id_rsa.pub"
```
### 3. Plan and Deploy
```bash
# Review planned changes
terraform plan -var-file="terraform.tfvars"
# Deploy infrastructure
terraform apply -var-file="terraform.tfvars"
```
### 4. Access Your VM
After deployment, Terraform will output connection information:
```bash
# View connection details
terraform output
```
#### Using Azure Bastion (Recommended)
1. Navigate to the Azure Portal
2. Find your VM resource
3. Click "Connect" → "Bastion"
4. Use your SSH private key for authentication:
- **Generated keys**: Use the key from `./ssh-keys/id_rsa`
- **Existing keys**: Use your existing private key
#### Using SSH (if public IP enabled)
```bash
# If keys were generated by Terraform
ssh -i ./ssh-keys/id_rsa azureuser@
# If using existing keys
ssh -i ~/.ssh/id_rsa azureuser@
# Or use the exact command from Terraform output
terraform output ssh_connection_command
```
## Configuration Options
### SSH Key Configuration
The configuration supports two methods for SSH key management:
#### Option 1: Auto-Generated SSH Keys (Recommended for Testing)
```hcl
generate_ssh_key = true
ssh_key_output_path = "./ssh-keys"
```
**Advantages:**
- Fully automated deployment
- No prerequisite key generation required
- Keys are automatically configured
**Security Considerations:**
- Private key is stored in Terraform state
- Use only for development/testing environments
- For production, consider external key management
#### Option 2: Existing SSH Keys (Recommended for Production)
```hcl
generate_ssh_key = false
ssh_public_key_path = "~/.ssh/id_rsa.pub"
```
**Advantages:**
- Private key never stored in Terraform state
- Better security for production environments
- You control key generation and storage
**Prerequisites:**
- SSH key pair must exist before deployment
- Public key file must be accessible to Terraform
### VM Sizing
Choose appropriate VM size based on workload:
- `Standard_B1s`: 1 vCPU, 1GB RAM (Basic workloads)
- `Standard_B2s`: 2 vCPU, 4GB RAM (Development/Testing)
- `Standard_D2s_v3`: 2 vCPU, 8GB RAM (Production workloads)
### Disk Configuration
- **OS Disk**: Premium SSD recommended for better performance
- **Data Disk**: Separate disk for application data, automatically attached
- **Disk Types**: Standard_LRS, StandardSSD_LRS, Premium_LRS
### Security Features
- **Azure Bastion**: Secure access without public IP exposure
- **Network Security Groups**: Configurable firewall rules
- **SSH Key Authentication**: Password authentication disabled
- **Diagnostic Logging**: Boot diagnostics and system monitoring
### Network Configuration
- **NAT Gateway**: Secure outbound internet connectivity
- **Private Subnets**: VM deployed in private subnet
- **Network Isolation**: Dedicated virtual network
## Resource Connections
| Source Resource | Target Resource | Connection Type |
|----------------|-----------------|-----------------|
| VM | Network Interface | `network_interface_ids` |
| Network Interface | Subnet | `subnet_id` |
| Network Interface | Public IP | `public_ip_address_id` (optional) |
| Subnet | Virtual Network | `virtual_network_name` |
| Subnet | NSG | Network Security Group Association |
| Subnet | NAT Gateway | NAT Gateway Association |
| VM | Managed Disk | Data Disk Attachment |
| VM | Storage Account | Boot Diagnostics |
| Bastion | Bastion Subnet | `subnet_id` |
| Bastion | Public IP | `public_ip_address_id` |
## Post-Deployment Tasks
### 1. Configure Data Disk
SSH into your VM and format the data disk:
```bash
# List available disks
lsblk
# Create partition (assuming data disk is /dev/sdc)
sudo fdisk /dev/sdc
# Press 'n' for new partition, then 'w' to write
# Create filesystem
sudo mkfs -t ext4 /dev/sdc1
# Create mount point and mount
sudo mkdir /data
sudo mount /dev/sdc1 /data
# Add to fstab for persistence
echo '/dev/sdc1 /data ext4 defaults 0 2' | sudo tee -a /etc/fstab
```
### 2. Install Software
```bash
# Update system
sudo apt update && sudo apt upgrade -y
# Install common tools
sudo apt install -y htop curl wget git
```
### 3. Configure Monitoring
Azure Monitor is automatically configured through the diagnostics extension.
## Cost Optimization
- **VM Sizing**: Start with smaller sizes and scale up as needed
- **Disk Types**: Use Standard SSD for non-critical workloads
- **Reserved Instances**: Consider reservations for predictable workloads
- **Auto-shutdown**: Configure automatic shutdown for development VMs
- **Spot Instances**: Use for interruptible workloads
## Security Best Practices
✅ **Implemented:**
- SSH key authentication only
- Private subnet deployment
- Azure Bastion for secure access
- Network Security Groups
- Diagnostic logging enabled
🔧 **Additional Recommendations:**
- Enable Azure Disk Encryption
- Configure Azure Monitor alerts
- Implement backup policies
- Use Azure Key Vault for secrets
- Enable Just-In-Time VM access
## Troubleshooting
### Common Issues
**SSH Connection Failed:**
- **Generated Keys**: Check that `./ssh-keys/id_rsa` exists and has correct permissions (600)
- **Existing Keys**: Verify SSH key path in `terraform.tfvars`
- Check NSG rules allow SSH (port 22)
- Ensure VM is running
- Verify key permissions: `chmod 600 ./ssh-keys/id_rsa`
**SSH Key Generation Failed:**
- Ensure the output directory exists or can be created
- Check file system permissions
- Verify `tls` provider is properly installed
**Terraform Apply Fails:**
- Check Azure CLI authentication: `az account show`
- Verify subscription permissions
- Ensure resource names are unique
- For SSH key conflicts, delete existing key files or change output path
**VM Performance Issues:**
- Monitor disk I/O with `iostat`
- Check CPU/memory usage with `htop`
- Consider upgrading VM size
### Useful Azure CLI Commands
```bash
# Check VM status
az vm get-instance-view --resource-group --name
# Start/Stop VM
az vm start --resource-group --name
az vm stop --resource-group --name
# List available VM sizes
az vm list-sizes --location "East US"
```
## Cleanup
To destroy all resources:
```bash
terraform destroy -var-file="terraform.tfvars"
```
**Important Notes:**
- This will permanently delete all resources and data
- Generated SSH keys in `./ssh-keys/` directory will remain on your local system
- To remove generated keys: `rm -rf ./ssh-keys/` (be careful!)
- Private keys stored in Terraform state will be removed when state is destroyed
**For Production Environments:**
- Backup any important data before destruction
- Consider using `terraform plan -destroy` first to review what will be deleted
- Ensure you have secure backups of any SSH keys you want to keep
## Support and Contributing
For issues and contributions:
1. Check Azure documentation for resource-specific questions
2. Review Terraform Azure provider documentation
3. Validate HCL syntax with `terraform validate`
## Version Information
- **Terraform**: >= 1.2
- **Azure Provider**: ~> 3.85
- **TLS Provider**: ~> 4.0
- **Local Provider**: ~> 2.4
- **Random Provider**: ~> 3.4
- **Target OS**: Ubuntu 22.04 LTS
- **Architecture**: Azure ARM64/x86_64
---
*This infrastructure is designed for single VM deployments. For multi-tier applications, consider Azure App Services, Container Instances, or Kubernetes Service.*
Share:

